
Você está planejando uma viagem ou férias? Quer capturar imagens lindas e memoráveis em sua próxima viagem? A fotografia de viagens é muito divertida, mas também pode ser muito desafiadora. Você está em um ambiente completamente novo, tem espaço limitado para equipamentos, precisa descobrir como tirar fotos originais de pontos turísticos e muitas vezes precisa se adaptar às necessidades de outros viajantes; Em outras palavras, você tem um lote pense sobre.
E como muitas viagens são rápidas, geralmente você não terá tempo para experimentar vários cenários, composições e técnicas de iluminação. Em vez disso, você deve fazer suas tacadas desde o início, o que pode ser uma tarefa difícil, especialmente se você for iniciante.
Nunca tema! Passei anos capturando fotos de viagens ao redor do mundo e neste artigo compartilho minhas melhores dicas, incluindo:
- Dicas de equipamentos para você começar
- As melhores configurações para fotografia de viagens.
- Como se preparar com sucesso antes de fotografar um novo destino
- Como voltar com fotografias exclusivas de assuntos populares
- Muito mais!
Quando terminar, você estará pronto para embarcar qualquer Vá em uma aventura com sua câmera, seja uma viagem rápida à sua cidade favorita ou férias prolongadas em uma parte remota do mundo.
Vamos mergulhar de cabeça.
1. Viaje com pouca bagagem

A fotografia de viagens, por sua própria natureza, é inspiradora e emocionante. Então, quando você está fazendo as malas para uma viagem, é fácil se deixar levar e acabar com vários corpos de câmera, um punhado de lentes, uma dúzia de acessórios e muito mais.
Mas isto apresenta vários problemas. Por um lado, quanto mais equipamento você tiver, mais pesado você se sentirá ao fotografar, causando desconforto e falta de inspiração. Além disso, aspectos práticos como franquia de bagagem e custos de seguro muitas vezes significam que transportar muitos equipamentos se torna muito caro. (Na verdade, se você estiver determinado a trabalhar com mais do que apenas uma configuração minimalista de equipamento, pode ser mais econômico alugar o equipamento na chegada.)
Meu conselho: viaje o mais leve possível. Limite seu kit até que você tenha:
- Um corpo da câmera de viagem (dois, se você tiver espaço para um sobrando na bolsa)
- Uma pilha de cartões de memória
- Um mini tripé leve ou até mesmo super flexível gorilapod
- Uma unidade de armazenamento portátil
- Uma câmera de bolso compacta
- Um brilho
- Uma pequena seleção de óculos de viagem
- Uma bolsa durável para câmera que distribui o peso uniformemente sobre os ombros e protege contra calor, frio, areia e umidade.
Desta forma você pode viajar com conforto e evitar custos extras. Lembre-se de que você pode querer sacrificar alguma flexibilidade para reduzir o peso (por exemplo, pode ser necessário deixar sua supertelefoto em casa). Basta lembrar que os benefícios de viajar com pouca bagagem superam em muito os custos!
2. Use uma lente zoom flexível

Esta é uma das maneiras mais fáceis de reduzir a carga em seu equipamento quando você viaja: abandone sua variedade de lentes e leve um zoom único e de alta qualidade.
Que tipo de zoom é melhor? Eu recomendaria comprar uma lente de 18-200 mm ou 28-300 mm, se possível. Na verdade, os detalhes da distância focal não são importantes; em vez disso, trata-se de carregar uma lente que fotografe em grande angular, padrão, e Distâncias focais telefoto: para que você possa capturar paisagens deslumbrantes, retratos padrão e edifícios distantes.
E preste atenção ao máximo da lente. abertura. Quanto maior a abertura, melhor, permitindo capturar belas imagens mesmo com pouca luz. (Infelizmente, os zooms de grande abertura são maiores, mais pesados e mais caros, então você terá que pensar sobre a abertura com muito cuidado. Você não quer comprar um zoom multifuncional que realmente pese avançar do que alguns pequenos números primos.)
Se, depois de embalar seu zoom multifuncional, você tiver espaço extra em sua bolsa, considere também carregar uma pequena lente principal (como 50 mm ou 85 mm, útil para retratos e fotografia com pouca luz). E se você leva fotografia de paisagem a sério, uma lente ultra grande angular, como 12-24 mm, geralmente é uma boa ideia.
3. Traga uma boa câmera fotográfica de viagem

Embora você possa capturar ótimas fotos de viagens com qualquer câmera, incluindo um smartphone básico, alguns modelos tornarão muito mais fácil obter resultados excelentes e consistentes que você pode imprimir em tamanho grande, compartilhar nas redes sociais e adicionar ao seu portfólio.
Agora, não existe uma câmera de viagem que sirva para todos, mas os melhores produtos tendem a oferecer:
- Um design compacto. Como você deve ter previsto, quanto menor e mais leve for o corpo da câmera, melhor. Os modelos sem espelho tendem a ser mais compactos que as DSLRs, e os modelos APS-C tendem a ser mais compactos que os modelos full-frame (e as câmeras Four-Thirds tendem a ser ainda mais compactas). No entanto, algumas câmeras full-frame são projetadas para viagens, então não pense que você precisa usar um sensor menor!
- Resolução sólida e qualidade de imagem com pouca luz. A contagem de megapixels não é grande coisa hoje em dia, especialmente porque a maioria das câmeras oferece resolução de pelo menos 20 MP, mas quanto mais pixels você tiver, maior poderá imprimir (em geral). Em outras palavras, se você planeja criar enormes impressões de viagens para sua sala de estar, provavelmente desejará comprar uma câmera de maior resolução! Algumas câmeras também oferecem melhores recursos de ISO alto do que outras; Quanto maior o ISO sem degradar visivelmente a qualidade da imagem, mais fácil será fotografar em ambientes internos, ao amanhecer/anoitecer e à noite.
- Foco automático razoavelmente rápido e velocidades de disparo contínuo. Se você for fotografar assuntos de ação (como pessoas e carros andando pelas ruas ou animais selvagens correndo), você vai querer uma câmera com recursos AF decentes. Você também vai querer procurar um modelo que ofereça um modo burst rápido para que não precise se preocupar em perder momentos de frações de segundo.
- Boa ergonomia. Quanto mais confortável for a câmera, mais fácil será fotografar o dia todo! Você também deve procurar recursos úteis, como uma tela sensível ao toque totalmente articulada e (em câmeras sem espelho) um visor de alta resolução.
Infelizmente, as melhores câmeras de viagem tendem a ser caras, mas há muitas opções econômicas que ainda farão um ótimo trabalho. Você sempre pode começar comprando um modelo básico; então você poderá aprender a usá-lo bem e atualizá-lo no futuro.
4. Use os modos e configurações de disparo corretos

A maioria dos fotógrafos de viagens se preocupa profundamente com a qualidade da imagem, e por um bom motivo: quanto melhor o arquivo de imagem, maior você poderá imprimir suas imagens, mais flexibilidade terá ao editar e melhor será a aparência de suas imagens impressas em todos os cenários. Portanto, eu recomendo fortemente que você implemente alguns modos e formatos específicos ao tirar fotografias de viagens.
Primeiro, certifique-se de que sua câmera esteja configurada para CRU. Isso lhe dará flexibilidade máxima de pós-processamento e, embora os arquivos RAW exijam edição, o resultado vale a pena. (Não está pronto para ir direto para RAW? Considere filmar em RAW+JPEG, que produz os dois tipos de arquivos sempre que você pressiona o obturador. Isso fornecerá arquivos RAW para edição aprofundada, bem como arquivos JPEG que você pode compartilhar imediatamente nas redes sociais, embora os arquivos adicionais ocupem mais espaço, portanto, certifique-se de ter cartões de memória e/ou discos rígidos externos suficientes. . mão.)
Segundo, saia do modo automático e atire Prioridade de abertura, prioridade de obturadorqualquer Modo manual. Essas três opções lhe darão controle sobre as configurações de exposição da sua câmera, o que é fundamental se você deseja capturar fotos criativas e detalhadas. A prioridade de abertura geralmente é um bom ponto de partida, mas se você gosta da ideia de ir mais fundo e na realidade Ao compreender todas as configurações da sua câmera, o modo Manual é outra ótima opção.
Terceiro, ajuste sua abertura e velocidade do obturador para diferentes efeitos criativos. A abertura influencia muito a profundidade de campo (ou seja, a quantidade de imagem em foco); Você pode criar um lindo fundo desfocado fotografando com um profundidade superficial de campo, o que pode ser muito útil ao fotografar pessoas ou vida selvagem. As configurações de velocidade do obturador manterão suas fotos de viagem nítidas, mesmo ao capturar ação, mas você também pode diminuir a velocidade do obturador para desfocar artisticamente assuntos em movimento, como água e nuvens.
5. Faça anotações todas as noites

Todas as noites, após um árduo dia de trabalho com as câmeras, reserve um tempo para fazer algumas anotações no diário sobre os eventos do dia. Pode parecer incomum, mas realmente faz a diferença.
Por um lado, ajudará você a adicionar palavras-chave e descrições ao organizar suas imagens posteriormente. E ajudará a refrescar sua memória meses ou anos depois, permitindo que você compartilhe histórias esquecidas (e as fotos que as acompanham) com amigos e familiares.
No entanto, não inclua apenas notas sobre eventos. Também encorajo você a anotar quaisquer pensamentos técnicos ou artísticos. Afinal, se você passar horas e horas em campo, com certeza irá aprimorar seus conhecimentos fotográficos: exposição, composição, técnicas de autofoco e muito mais. Ao reservar um tempo para anotar quaisquer descobertas importantes, você ajudará a solidificá-las em sua mente e também a criar um pequeno diário de referência que poderá reler (e reaprender!) Anos depois.
6. Reserve horários específicos para tirar fotos.

Se você deseja combinar fotografia de viagens e férias, especialmente se estiver viajando com outras pessoas, poderá se deparar com um problema:
Embora a fotografia de viagens seja muito divertida, as férias (por exemplo, relaxar na praia, passear no restaurante do hotel, etc.) são muito mais fáceis. Se você não tomar cuidado, poderá passar muitas férias e tirar poucas fotos. Claro, não há nada enganado com essa abordagem se é isso que você deseja da viagem, mas se seu objetivo é capturar um portfólio de fotos de viagens de alto nível, é importante que você dedique períodos ininterruptos de tempo para fotos sérias.
Recomendo agendar deliberadamente sessões de fotos em determinados locais. Você pode fazer isso mentalmente (“Vou atirar [specific location] em [specific time”), or you can tell your traveling companions where you plan to be and when. Not only will this ensure that you spend the necessary time working with your camera, but it’ll also help your friends or family members adjust to the realities of travel photography, which can be difficult for a lot of folks.
7. Scout locations in advance
Scouting is an underappreciated and underutilized part of travel photography – but in my view, it’s absolutely essential.
Without scouting, you may never find the best views, the best architecture, and the best street scenes. You may not photograph attractions at the right time of day, either, which means that your photos won’t be as good as they can possibly be.
Of course, when you’re on a trip and you’re crunched for time, scouting may seem impractical, which is why I recommend a scouting approach that relies heavily on pre-trip research. Here’s what you should do:
- In the months leading up to your trip, do some thorough research on the internet. Everyone’s process is different, but you might consider looking at other photos captured at the location, articles discussing key photography spots, or even satellite images on Google Earth.
- Make a list of all the key locations you want to photograph. Consider the position of the sun and how it will affect your opportunities. Determine whether each location is best visited at sunrise, sunset, or midday. And feel free to prepare a shot list for on-location use.
- When you arrive at your destination, consider walking to the local tourist information center. Ask the staff for any recommendations, as they’ve often spent a lot of time on the ground and have likely interacted with plenty of photographers. If you have the time and money, you might even ask whether there are any local guides or fellow photographers who can show you some of the best areas.
- Finally, use all of your research and planning to tackle each opportunity.
While the scouting approach I share above will certainly work well, if you do happen to have extra time on your trip – especially if the light isn’t cooperating for photography – some in-person scouting can certainly be beneficial. You can always have fun walking to different locations and considering possible shots, which you can use in the days to come.
One caveat, however: You need to be prepared to drop everything and change your approach at a moment’s notice. When traveling, things can happen: the weather might not cooperate, your transportation might fail, or (on a more positive note!) you might run into a better opportunity. Don’t focus so much on your plans that you fail to adapt to real-life conditions.
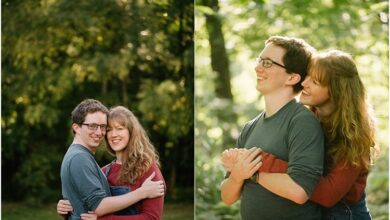
8. Ask for portraits

We’d all love to grab those beautiful travel portraits – the kind of images that express the subject’s culture and character – but many of us choose to fire off a telephoto shot from across the street out of fear of rejection.
Here’s the thing, though: up-close, personal, intimate portraits are so much better than images taken from a distance. And plenty of people are happy to pose for a moment while you take your shot, provided you ask for permission.
So take a deep breath and just go for it. Say, “Excuse me, could I take your photo?” The worst that could happen is that they decline – which, when you think about it, is not actually that bad. Plus, chances are that they will smile and nod their head in agreement. Then you can capture an image or two.
(If you’re photographing someone who doesn’t speak your language, you can generally catch their attention and just point to your camera.)
By the way, if a person does agree to sit for an image, then be sure to thank them and show them the LCD monitor afterward. You might even take a handful of images, especially if they seem relaxed. But don’t linger. When it’s time to move on, then move on.
One more tip: When you do find someone who’s willing to pose for you, take the time to adjust your camera settings and choose a composition that’ll give you a good result. Make sure you get on their level, use a wider aperture to create background blur (or a narrower aperture to keep the surroundings in focus), and watch out for background distractions.
9. Take proper precautions
Most places are relatively safe. But even the safest places have their rough parts, and you – as a tourist carrying thousands of dollars worth of equipment – are often an ideal target.
So when you’re out shooting, be careful. Always tell someone where you’re headed, never take more gear than is necessary, carefully check your routes in advance, and even as you shoot, pay attention to your surroundings. If you feel uncomfortable in a certain area, then consider moving on.

I also recommend you take certain steps prior to your trip. Take out adequate travel insurance – that way, if you get injured or sick, you won’t have to pay thousands of dollars for medical care. And get an insurance policy on your gear. Some policies even pay for emergency gear rentals in the event that your equipment is stolen.
(Note: Before purchasing travel or gear insurance, be sure to check the policy carefully. You may find that certain activities and situations aren’t covered, such as adventurous activities and gear water damage. The devil is in the details!)

Also, invest in solid luggage locks and maybe even an anti-theft bag (there are plenty of good ones designed specifically for photographers!). And pocket a small amount of local currency in an easy-to-reach place, then keep the rest of your cash elsewhere.
Finally, keep a list of emergency numbers and phrases on your person. It might seem like overkill, but better safe than sorry, right?
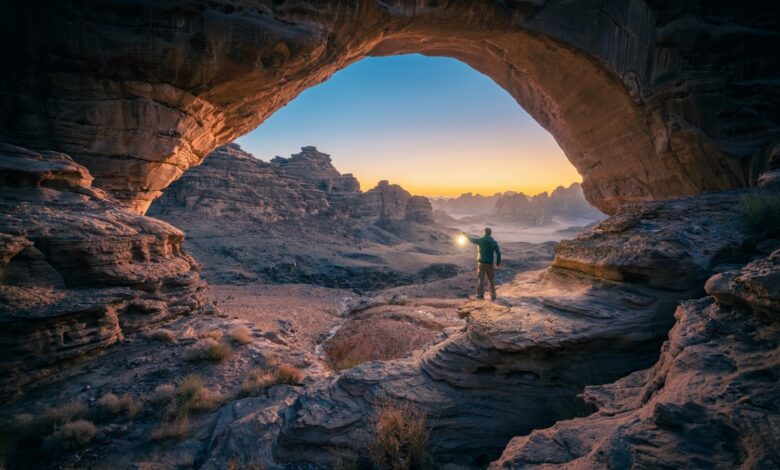
10. Think outside the box

Photography is all about creativity. But if you only shoot the obvious travel photography ideas – the kind that you’ll find in any tourist guidebook – then you’re bound to feel uninspired, bored, and (pretty soon) burned out.
Of course, certain views are popular for a reason. They often look strikingly beautiful, and it can be fun to capture your own version of a timeless image, even if it’s not strictly original.
So have your fun. Take the popular shots. But then go farther. Look for unique angles and compositions and lighting. Consider your creative possibilities, such as shallow depth of field effects and even intentional camera movement techniques. Try to see the scene from a perspective that is very you.
My recommendation? Limit yourself to ten safe photos, where you focus on nailing the exposure and other technical qualities. Then unleash your creativity.
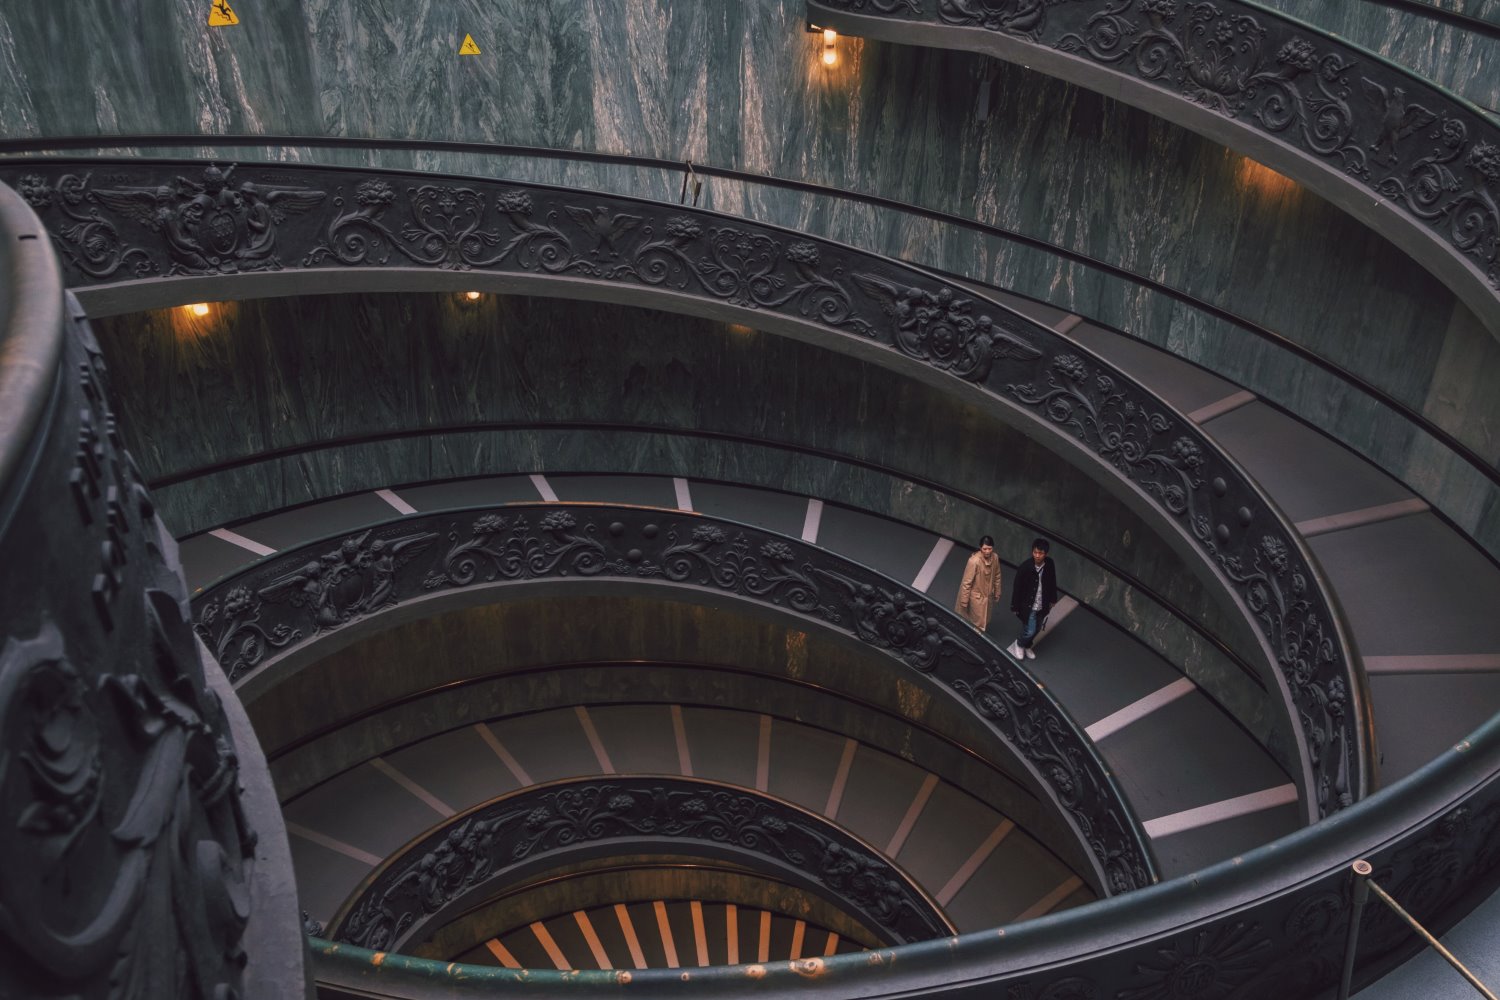
A few ideas for original images:
- Shoot from the ground with a wide-angle lens (even if it makes you dirty!)
- Climb some stairs and shoot from above
- Wait for dusk, mount your camera on a tripod, and slow down the shutter speed (to capture a stunning shot full of beautiful light and colors)
- Work on compositions with leading lines, diagonals, and frame-within-a-frame elements
Really, the sky is the limit. It’s art, after all. So flex those artistic muscles!
11. Research your location

Technically, this is part of the scouting process, but it’s so important that I decided to give it a section of its own.
When I say that you should “research,” I’m not just referring to shooting locations, scenic vistas, and so on. I mean that you should really dive into the culture and history of your travel destination. Try to understand what’s unique about the location. Try to understand what living in the location is truly like. Try to understand why the buildings and the landscape look the way they do.
Then use your research to inform your images. If you discover that a certain building has an interesting history, go and photograph it (while paying careful attention to the way the history is expressed through the building). If you discover that a certain location has an unusually robust fishing industry, go and photograph the local workers.
Also, if you haven’t yet booked your travel arrangements, check the local calendar for spiritual or religious events, traditions, national holidays, and cultural celebrations. Then schedule your trip to coincide with one (or more) of these events. Visiting during the right time can offer an astonishing breadth of photographic opportunities, especially if you’re a fan of portrait and documentary images!
12. Post-process your travel photos

Post-processing is an essential part of all forms of photography, and travel shooting is no exception. While you don’t need to spend tons of time on each photo (unless you want to!), you should at least spend a bit of time in Lightroom, Adobe Camera Raw, Capture One, or any other basic RAW processor.
Be sure to correct the white balance, do a bit of distortion correction, and adjust the exposure as needed. Then feel free to experiment with various other options that’ll give your images more pizazz: Crop to improve the composition, add a bit of saturation to make the colors pop, add some Clarity or Texture for improved crispness, and boost the contrast.
Over time, you’ll start to develop an editing style of your own, but when you’re first approaching travel photo editing, just have fun and see what you can create.
13. Do something with the images

So many beautiful images languish on hard drives. They go unshared. They go unviewed. They go unused.
Don’t let your hard work go to waste.
Once you’ve arrived back home after a trip, go through your images. Organize them carefully, find the best shots, and enhance them with editing.
Then consider what to do next. If you’ve bagged some wonderful photos, you could enter a travel photography competition. You might consider uploading the files to a stock site to gain a bit of extra revenue.
You might also use your images as the start of a portfolio, which you can use to approach magazines, travel guides, and tourism websites.
Finally, whether or not you decide to make money off your photos, be sure to share them with family and friends, either in person or on social media. You could even put together a little presentation where you discuss your travels, tell stories, and share your favorite shots.
Travel photography tips: final words
Travel photography may seem like hard work, but it’s a lot of fun, and it can be so rewarding.
So remember these tips. And the next time you go on a vacation, you’ll be guaranteed to capture some stunning photos!
Now over to you:
Which travel tip is your favorite? Which do you plan to follow? And where will you travel next? Share your thoughts in the comments below!
-
GENERAL
-
PREPARATION
-
LIGHTING
-
COMPOSITION
-
GEAR
-
ADVANCED GUIDES
-
POST-PROCESSING
-
BUSINESS
-
INSPIRATION